Overview
Sequence Structure
A sequence diagram's most important feature is the flow of information between it's unique parts, as well as when and how they communicate. The elements used to model a sequence are as follows:
Components - The people or things which communiate with one another, they are capable of sending and recieving messages.
Messages - The information sent between different components.
Lifeline - The lifetime of an object, represented by a "tail" underneath each component.
Formatting - Any extra elements of the sequence that help to clarify or organize existing information.
Sequence Example
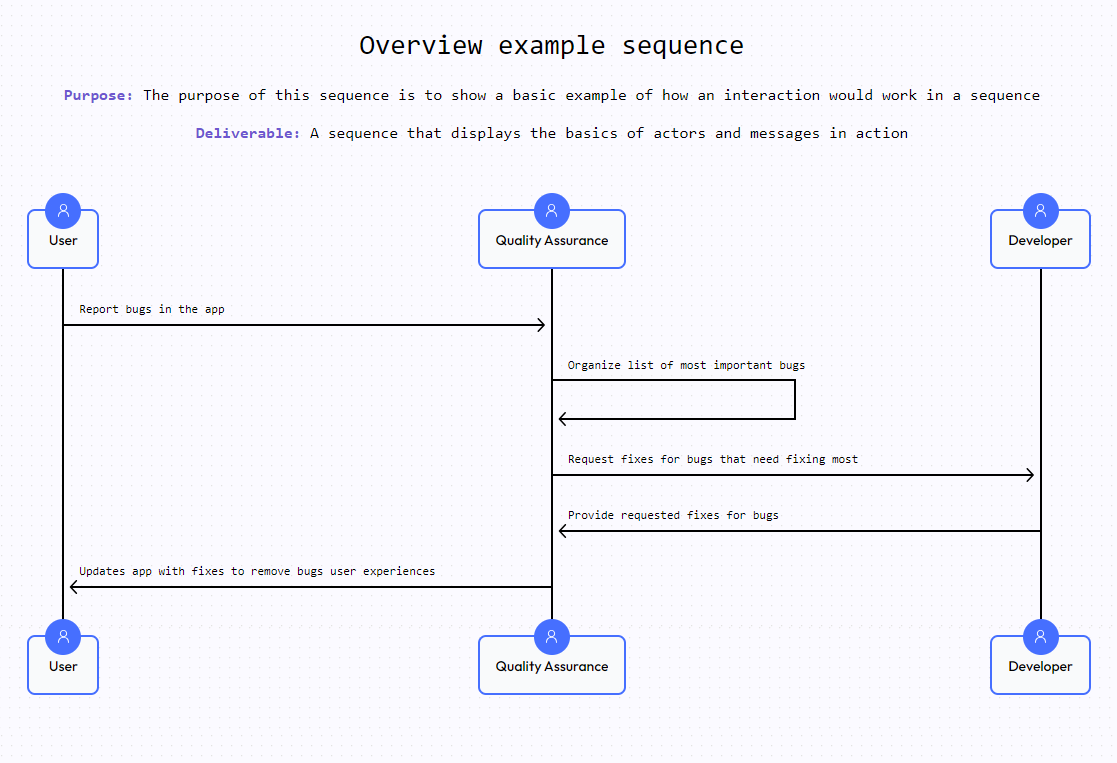
A sequence modeling a simple interaction between 3 people, note how each actor may both send and recieve information to each other. These actors may also send information to themselves if need be.

More important than the simple elements of the diagram is the core feature which is not mentioned as an element - Time. The key element of any good sequence diagram includes the understanding that these proccesses mapped out within the sequence diagram happen relative to each other, sequentially.
This simple organization helps developers, businesses, or even individual people, map out what needs to happen, when, and with whom or what. This is the core of what makes a sequence diagram so powerful is that it takes what can often be messy or inexact proccesses or plans to make, and solidify them into something that is both clear and actionable. Here, everything important to a plan or proccess is charted out and given clear order.
Sequence Page Screen
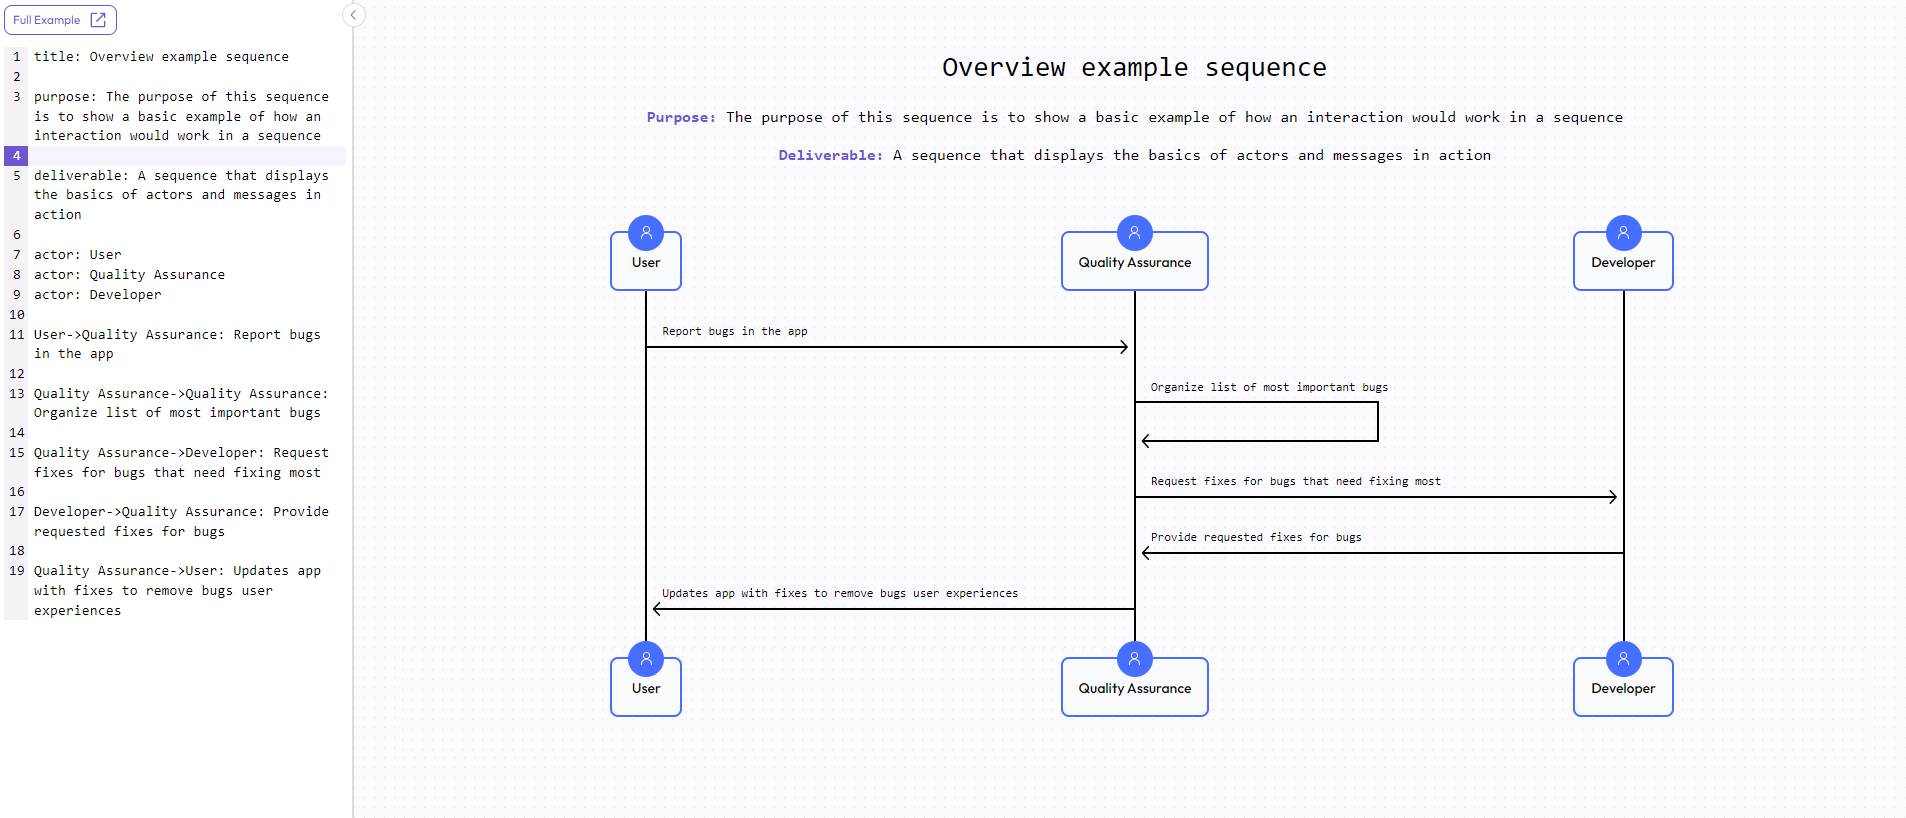
This is the page used to create the sequence above. This is the screen that you will use to create your own sequences like this one. Here, we can break down the elements of the page and it's controls which control the creation of this sequence. This way, we can understand how these tools apply to sequence generation in general.

title: Overview example sequence

purpose: The purpose of this sequence is to show a basic example of how an interaction would work in a sequence

deliverable: A sequence that displays the basics of actors and messages in action

actor: User
actor: Quality Assurance
actor: Developer

User -> Quality Assurance: Report bugs in the app

Quality Assurance -> Quality Assurance: Organize list of most important bugs

Quality Assurance -> Developer: Request fixes for bugs that need fixing most

Developer -> Quality Assurance: Provide requested fixes for bugs

Quality Assurance -> User: Updates app with fixes to remove bugs user experiences
The detailed sequence page has 2 distinct pieces to it: The Sequence canvas, and the Sequence editor.
The canvas is the right side of the page, which provides a view of the actual completed sequence. This is the view provided earlier, displaying only the content of the sequence. The content of the canvas is created by using the editor on the left side.
The editor is the left side of the page, which provides the syntax tools needed to create and modify the sequence. Any syntax written on this editor view will change the appearance of the sequence canvas itself. By writing syntax into this editor, you can create in real time the sequence you want.
The Sequence Editor
The sequence editor is the portion of the sequence diagram which controls the appearance and content of the sequence. It contains the input used to create the sequence diagram. This input is organized through the use of keywords and commands. Different keywords exist which control the content of a specific element of the sequence diagram. By including and modifying the value of these keywords and commands, a sequence can be constructed.
Keywords
In the above example, you can see the keywords used to control the content of the sequence shown. We can see the title, purpose, deliverable, and actor declarations, as well as the messages being sent by those actors. By invoking these keywords and assigning them to the values we want, we are able to control the value of each element in the sequence. By declaring title: for instance, we are able to assign the title value to any value we want in this sequence, which will be reflected in the graph when written.
To view the full list of keywords and declarations available, the full syntax example is available for viewing at any time by clicking on the "Full Example" button in the editor window. This will list all of the keywords that can be used.
Some keywords are limited to one per sequence. These must not be duplicated or else it will cause errors within the sequence. The title, purpose, and deliverable are limited in this way. Actors, databases, and collections are not and can be invoked many times over.
Keywords available:
Title: Controls the title of the sequence
(1x per sequence)

Purpose: Controls the purpose subtext
(1x per sequence)

Deliverable: Controls the deliverable subtext
(1x per sequence)

Actor: Declares an actor and the name of that actor (actor: Bob)

Participant: Declares a participant and it's name

Database: Declares a database and it's name

Collection: Declares a collection and it's name
Commands
In addition to keywords are commands. These commands differ from keywords in that they are not created with the name of the command, but rather a specific syntax. Commands can be used an infinite ammount of times.
In the example sequence provided, one of the commands used was a message. These messages are vital to a sequence, but do not use a keyword. Instead, they must be created using a specific syntax. Component 1 -> Component 2: A message. Let's break this down.
Component 1is the first component we are using. It can be a participant, actor, database, or collection.From this component, we draw a connection (
->) withComponent 2. This second component will recieve the message sent.: A messageis used to create the actual message that will be sent. Everything after the:colon will be added to the sequence as text.: Enter your text here.The
:colon is used to tell the first half of the commandComponent 1 -> Component 2that a text will be sent as a part of the connection.
To send a message like this is a combination of 2 commands. The first part is the creation of the connection between Component 1 and Component 2, and the second part appends text to the connection we are making.
Using these commands is essential to the creation of a complete sequence diagram. For further details on different commands and their use, see the syntax section
Now that you understand sequence diagrams, their purpose, and how you can use syntax to create its elements, feel free to sudy the syntax of how to use the tools provided to you in SequenceStack. Good luck and happy sequencing.